Faroe Islands Photography Guide (Part 1)

The Faroe Islands is a place not many have heard of. An autonomous country within the Kingdom of Denmark, the Faroe Islands are located approximately 300km north of Scotland, and halfway between Denmark and Iceland. Its a land of contrasts - modern subsea tunnel infrastructure and helicopter services connecting remote farming villages with more sheep than people. 

Although its a sub-arctic island, its location in the Gulf Stream keeps temperatures above freezing year-round. Which means there isn't really a bad time of year to visit - we went in mid-April of this year (2017) and got rain, wind, sunshine and snow.

Overview of the Faroe Islands

The Faroe Islands is a group of 18 islands, with only one major island (Litla Dimun) uninhabited. We spent most of our time on Vagar, Streymoy, Eysturoy and Suduroy. I'll focus on a dozen or so key photo spots that I visited over my week on the islands.

You'll fly into Vagar airport, on the island of Vagar, and we chose to spend a couple of nights here in an AirBnB in Midvagur (down near the docks).

Faroe Islands Key Photo Locations

Faroe Islands Key Photo Locations

If anyone is familiar with the islands, you'll know that I missed several locations (notably Kalsoy). There were days when the weather just didn't play ball and I couldn't get to where I wanted to go - such is life on a trip to the Faroe Islands.

1. Gasadalur and Mulafossur

The classic Faroe Islands photography location. If you've seen a picture of the Faroe Islands, its probably this spot you've seen. Until 2004 this location (and the village located here) did not have a road connection to the rest of Vagar. Neither could it be accessed by boat for most of the year, so the only way to get here was to hike over a 400m high mountain pass.

Location - very easy spot to get to.

Location - very easy spot to get to.

As you'll see above, this location is very easy to get to. There is only one road in and out, so take the 45 out from Sorvagur. You'll pass Bour on your way, which is a great little village with awesome views over to Tindholmur. Continue through the tunnel, and down towards Gasadalur (watch the road in, its steep and slippery when its wet). The best spot to park is marked on the map - there is a little pull-out parking area near a fence that fits two or three cars maximum (watch out for the little sheepdog that likes to play fetch with stones). If this little area is full then you can continue into the main village and park there, and wander back down the road.

Composition wise there aren't too many options - the waterfall (Mulafossur) is so iconic and you can really only shoot from one or two spots. The best spot (or near to it) is marked on the map above (and its from where the shot below was taken).

Gasadalur from the classic view point, after a dusting of snow.

Gasadalur from the classic view point, after a dusting of snow.

You also get a great view over the island of Mykines.

Mykines from Vagar.jpg

In addition to these shots, you can also climb down a set of rocky stairs to the shoreline (the area circled in red in the map above). On the few times we visited this spot the winds were blowing hard, it was raining or had just finished snowing so we never felt confident enough to get down and up those stairs in one piece.

2. Bour

Easy to fold into your road trip to Gasadalur. The village of Bour is small and quaint, and has a couple of the classic turf-roofed houses. The village is located between Sorvagur and Gasadalur, a short turn-off from the main 45 road. Watch out for the sheep who roam the roads here as if they own them.

The village of Bour.

The village of Bour.

As well as the huts and houses themselves, there are great views out across the water to the rocky Tindholmur. You'll also come across a few viewpoints with small parking areas on the road between Gasadalur and Sorvagur, so pull over and have a look.

The view across to Tindholmur.

The view across to Tindholmur.

3. Leitisvatn

You'll see this place noted as either Sorvagsvatn (what the people on the west in Sorvagur call it) or Leitisvatn (what the people in Midvagur and Sandavagur call it). This is where you can get the classic "floating lake" photo that you'll probably have seen on Instagram.

Getting here is reasonably easy, but it requires a hike of a few kilometres with a steepish climb at the end. The high cliffs at the end of the hike are very exposed, so don't go if the weather isn't looking good and be prepared to turn back if it gets bad.

Overview of the walk out to the cliffs.

Overview of the walk out to the cliffs.

Parking can be a little tricky to find - there is a small slip road right before the bend in the main road that you can park in. Its very easy to miss the turn into the parking, as it isn't signed.

Parking location and start of the trail.

Parking location and start of the trail.

Wander alongside the main road until you get the well established path. Pass through the gate (close it behind you, this is still grazing land) and continue past the working farm /  stock yard. You'll follow a rough path alongside the lake - we stuck to the firmer ground and the worn path where it was obvious.

Towards the end of the lake you'll see the path steepen and head up to the left. Follow the path upwards as best you can (use the dried river beds as a rough guide). There aren't any signs up here, but you'll come across some old ruins and stone work which indicate you're in the right place. To get the classic view you've seen from here you need to get super-close to the edge of the cliffs to your left (if you're facing straight ahead when walking up the hill).

The classic "floating lake" viewpoint.

The classic "floating lake" viewpoint.

Try and not fall off the edge.

4. Koltur View

One of the best things about the Faroe Islands is that because the islands are so close together you'll often get multiple different angles of many of them, and they look completely different from place to place.

This spot isn't really an official "wow" viewpoint or in the guidebooks as a must see, but it caught my eye as we were driving past it on our way back to our accommodation in Midvagur one day.

Koltur and Hestur

Koltur and Hestur

Something about the fishing farm nets, sea fog and low cloud made this scene look almost alien in nature. Koltur and Hestur look far narrower and precipitous from this location (as opposed to how they look from the west shores of Streymoy). Like many spots, there isn't a designated view point or parking lot, so just pull into a parking bay wherever the view looks best.
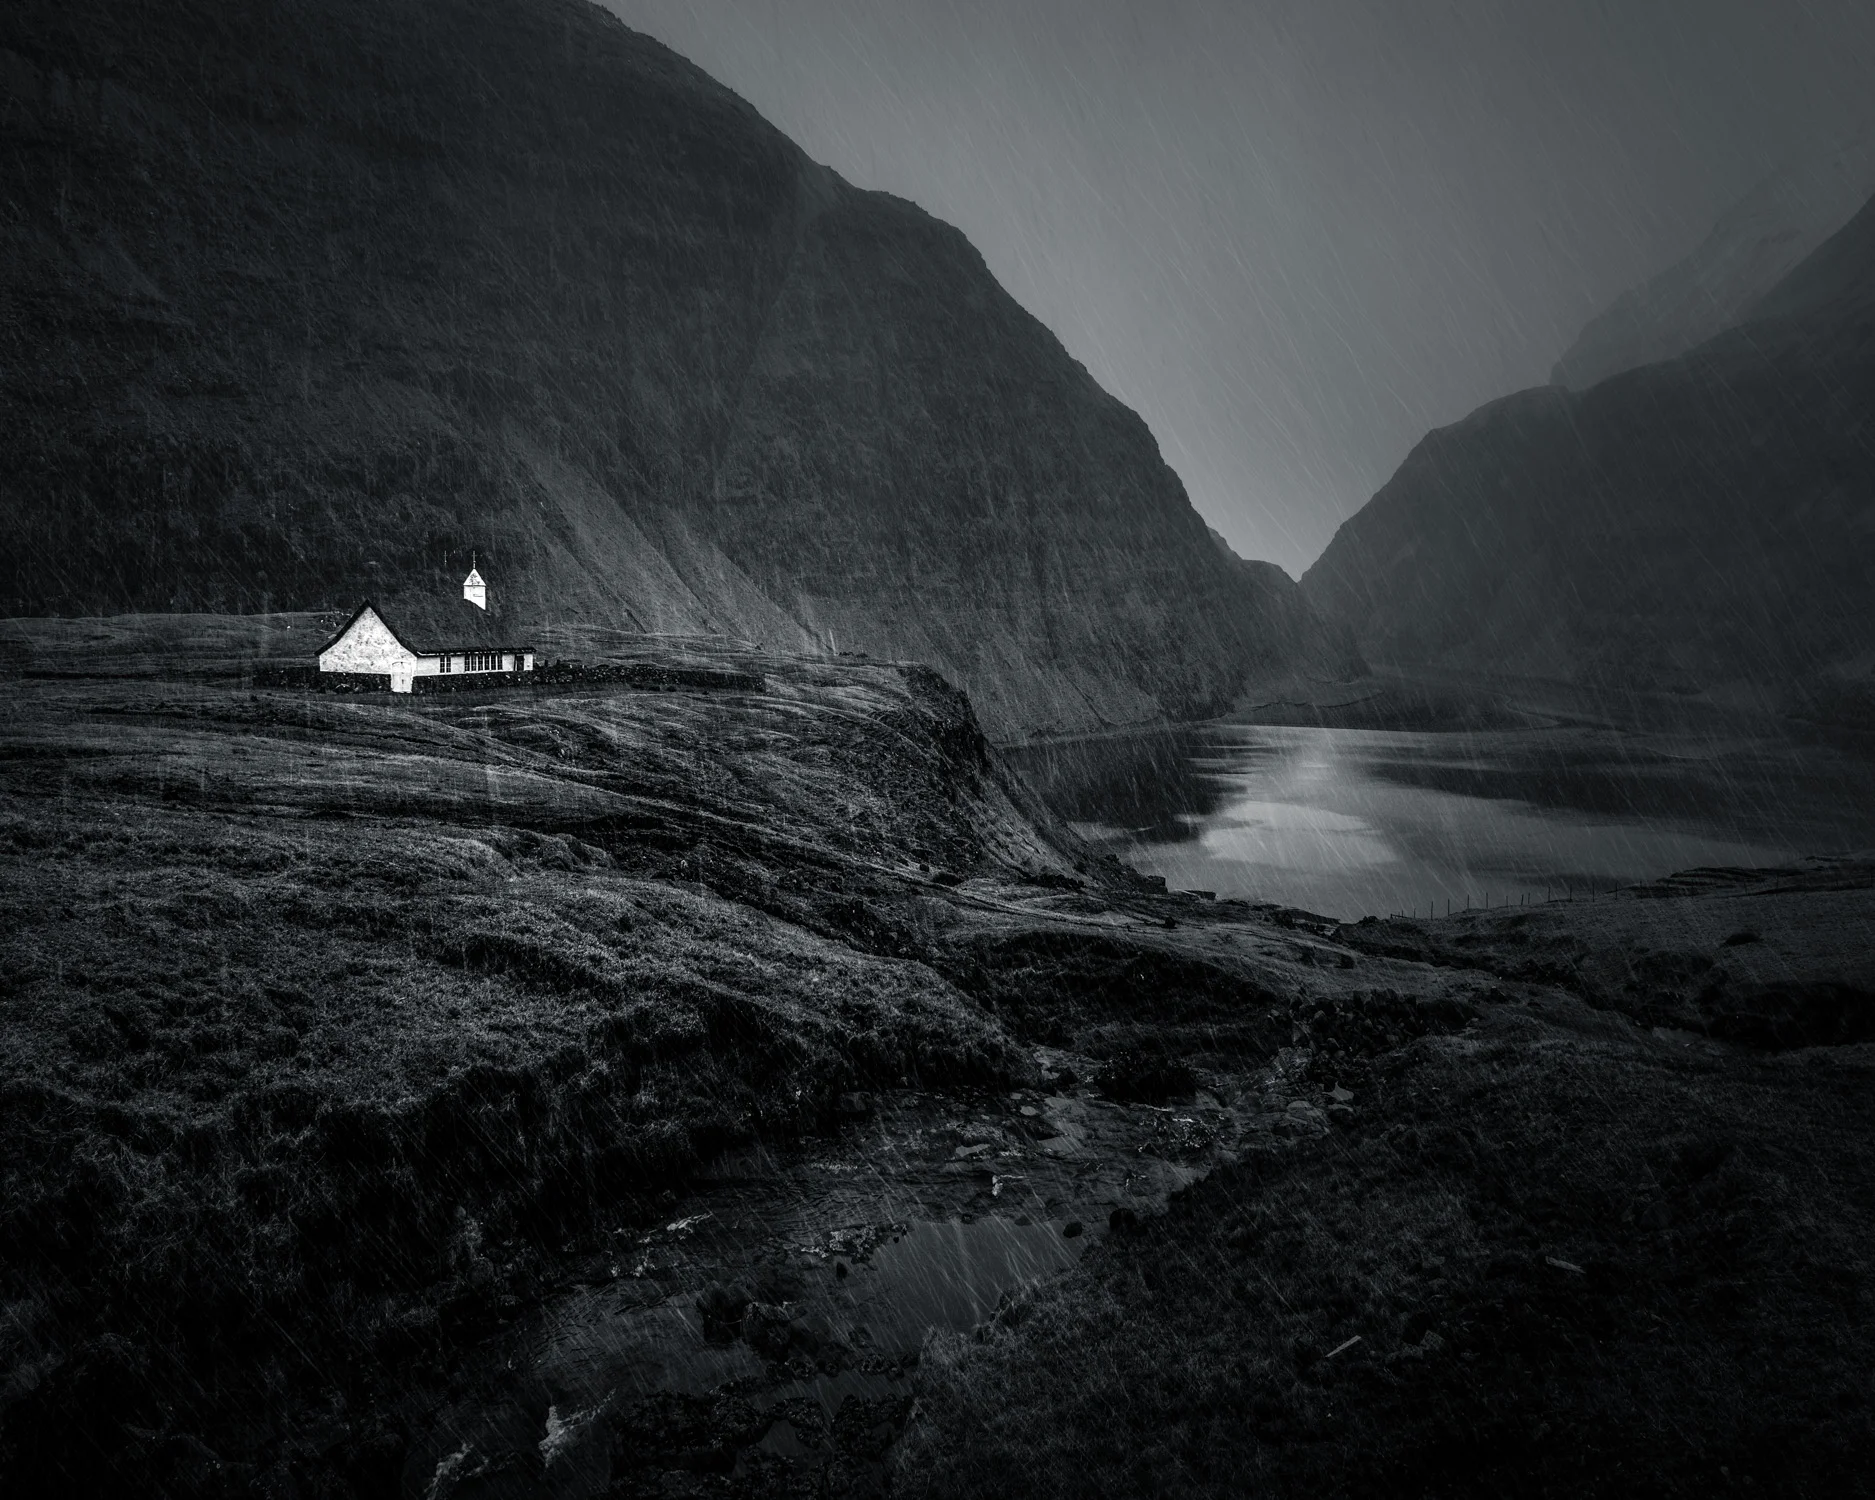
5. Saksun

Another the classic Faroe Islands photo locations, and a very popular tourist destination. To get here, take Road 53 from near Streymnes. If this is one of your first stops on arrival to the Faroe Islands then Road 53 will probably be your first windy, single land road. Its not too bad and its sealed all the way, just keep an eye out for oncoming traffic and make use of the passing bays. Be careful if its snowed recently though.
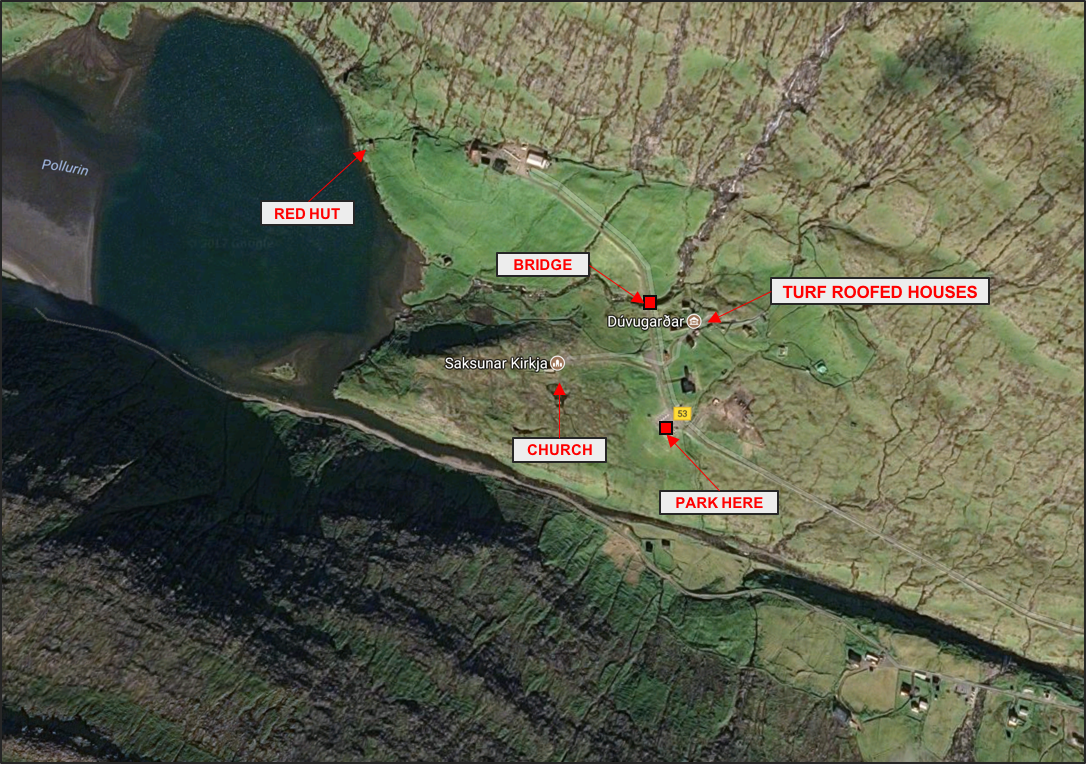
Saksun overview

Saksun overview

Towards the end of the road keep to the right (so you don't go into the little village on the left). You'll probably see the little church first when you arrive into the old village of Saksun. Park in the parking bay just off the road and head out to explore. The little turf-roofed huts you've seen in the photos are up the hill on the right-hand side of the road - one of these is now a museum.

Grass Roofed Huts

Grass Roofed Huts

Its best to have something wide here lens-wise. I shot the above at around 24mm (full frame) and could have gone a few mm wider. We also lucked out and got a bit of snow as well. Down in front of these huts there is a little white church (you'll see it from the carpark when you arrive). I found the best spot to get both the church and lagoon in the one shot was from the bridge on the main road.

Saksun Church (monochrome)-2.jpg

There isn't much more in Saksun itself. There is a little farm with a red cottage further down the road from the church and grass roofed huts, but it was snowing pretty hard by the time I'd finished up and I couldn't really feel my fingers.

On the road out of Saksun you'll come across many little huts, often set against a backdrop of rising hills. There isn't any best spot in particular - just pull in when you see something you like (and theres enough room beside the road to park).

Road to Saksun.jpg

The hut above isn't a particular place of note, just one of the little scenes you see from the car. The combination of the fresh snow on the mountains and nice light made it a must-stop location.

6. Tjornuvik

The northernmost town on Streymoy, and home to a great black sand beach and some fantastic rock structures. Its also the main surfing beach on the islands, if thats your thing. There isn't much foreground interest on the beach except for some rocks and the channels cut into the sand by the runoff from the rivers behind the town.

Tjornuvik Beach.jpg

Off in the distance in the shot above you can see the rock formations of "Risin og Kellingin" (the Giant and the Witch) - I'll let you look up the story behind these online.

Risin og Kellingin

Risin og Kellingin

Above you can see a closer view of these rocks, shot from the beach at Tjornuvik with a 200mm lens. 

7. Mountain Pass

Again, this isn't a designated viewpoint, its just one of those scenes you come across as you're driving around. Its classic Faroese scenery - hills, grass-roofed huts and sheep overlooking the ocean.

DSC_3330-Edit-Edit-Edit.jpg

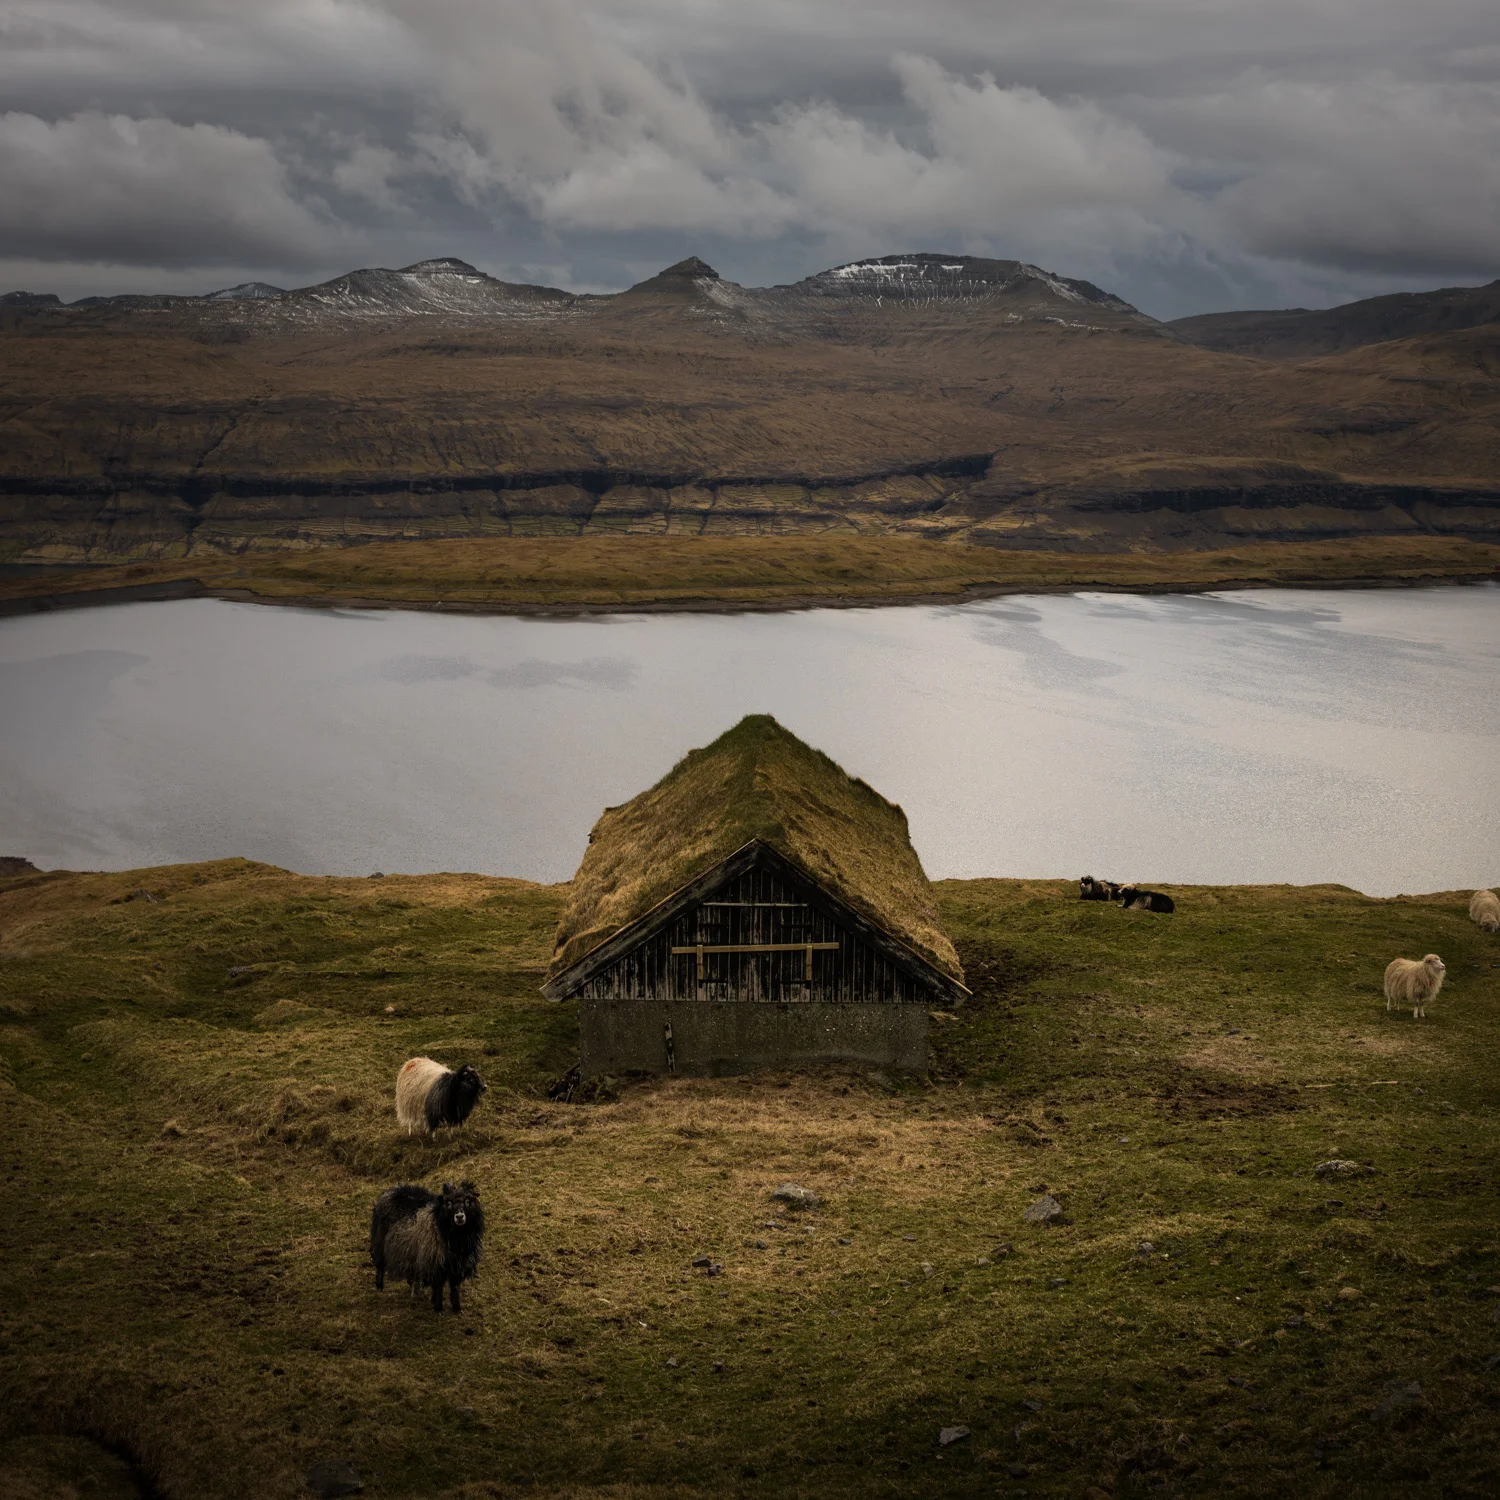
You can find this particular spot on the road between Funningur and Eidi - be careful on the road if it has been snowing, as it can get hairy. Stop off and climb Slættaratindur while you're here if you're feeling adventurous - at 882m high its the tallest mountain on the Faroe Islands.

8. Gjogv

Located at the very north end of Eysturoy. The town is best know for its gorge (Gjogv translates literally to gorge), which is used as a natural harbour. I couldn't find a composition that worked at the gorge - the light was harsh out towards sea and the tide was low. I did find this great little hut that was framed by a couple of peaks.

The road in is another windy single-lane deal, so take it slow.
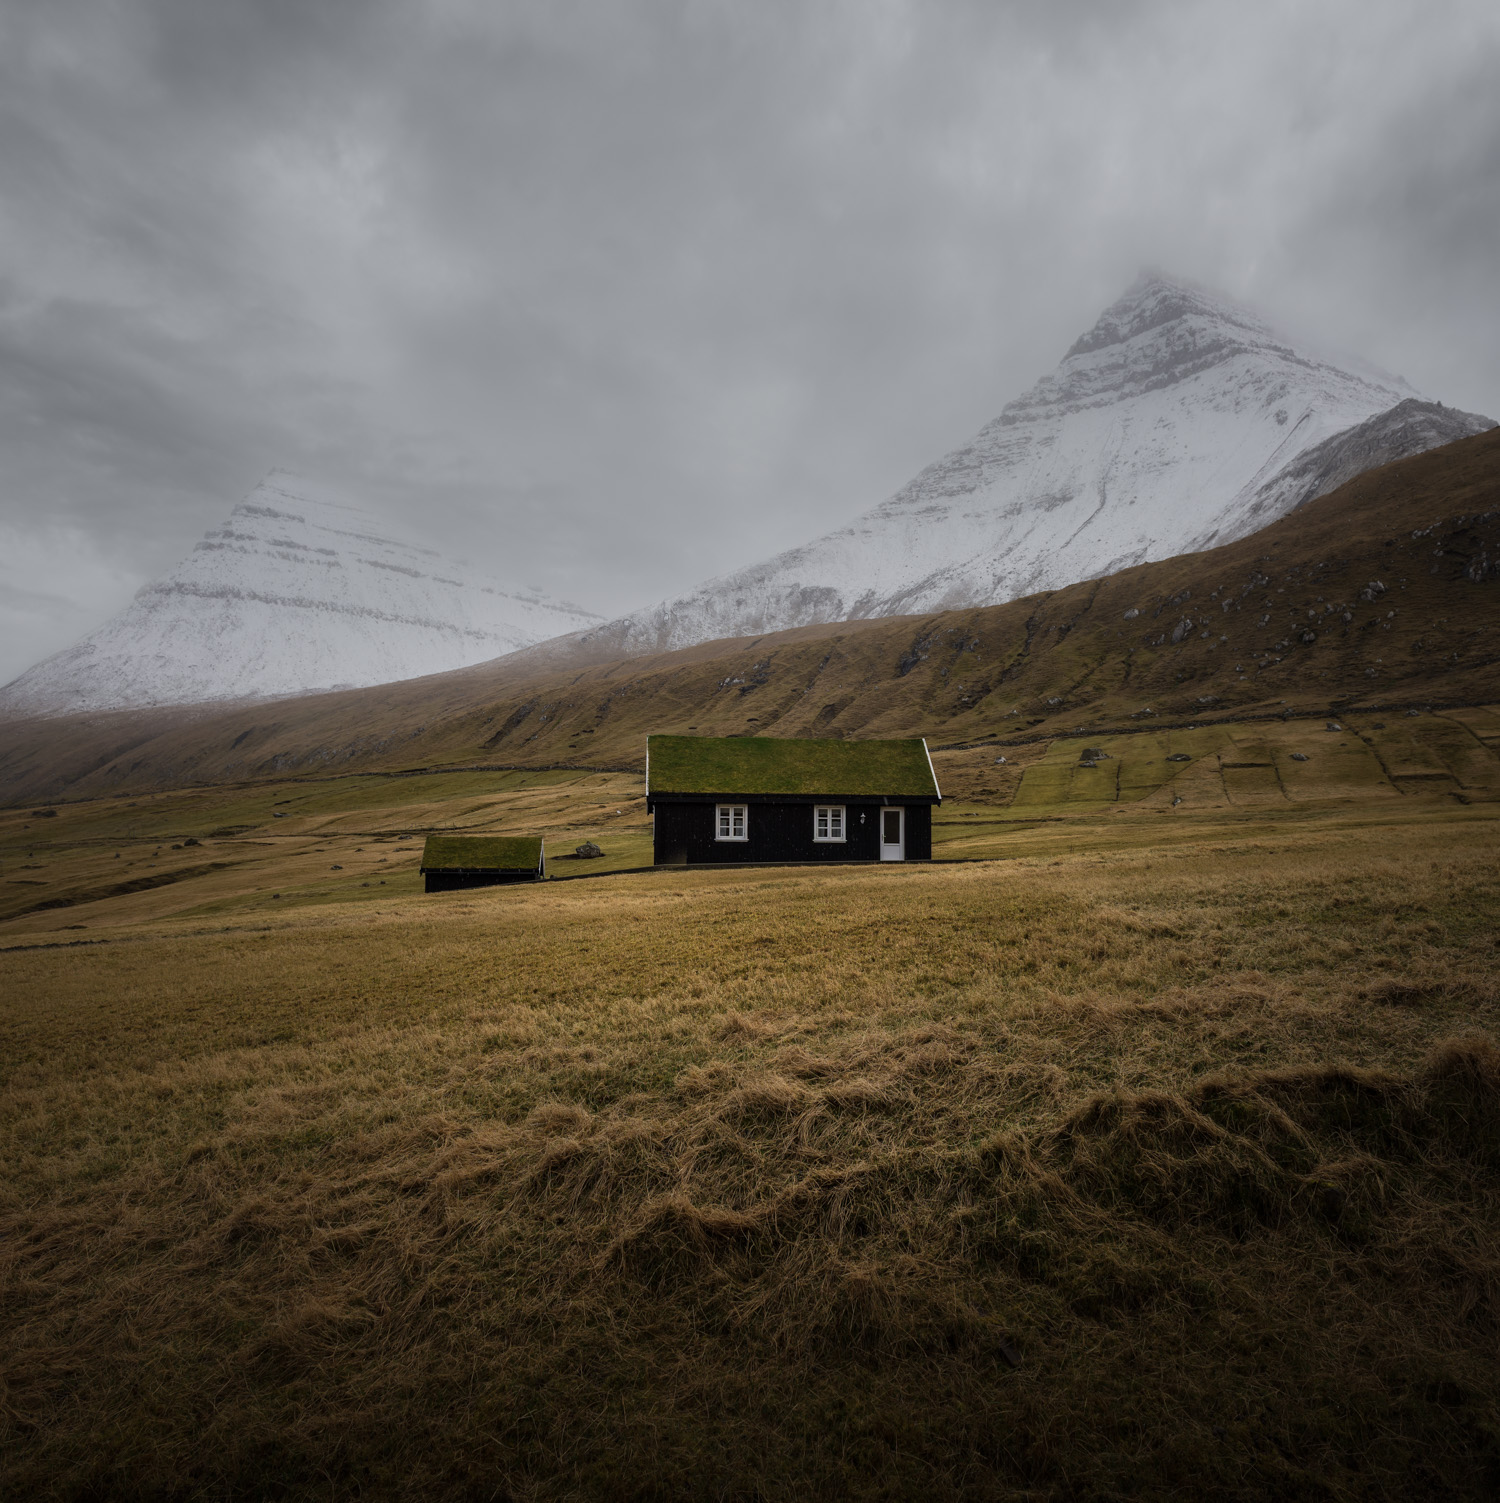
Huts near Gjogv.

Huts near Gjogv.

Oh, and these huts are all people's houses - shoot from a distance and be aware that locals are just trying to go about their day. And don't stare through the windows.

Stay tuned for Part 2, where I'll go into some more detail on the island of Suduroy.

The Marble Caves at Puerto Rio Tranquilo

San Carlos de Bariloche was to be our next stop after El Chalten. Looking at a map it was clear that there was a lot of empty space between those two places, and we hoped there would be something (anything) around the mid-point for us to break-up the trip. Some Googling revealed the marble caves at Puerto Rio Tranquilo as the most promising option. Unfortunately there is a lack of up-to-date information about these caves online, so I've put together some pointers on how to get there.

Relative location of Puerto Rio Tranquilo.

Relative location of Puerto Rio Tranquilo.

What are the Marble Caves?

The marble caves (which include the caves, as well as the Capillas de Marmol - the Chapel of Marble) are a collection of natural marble formations which have been shaped over time by wind and water erosion. They are located a short speedboat ride from the town of Puerto Rio Tranquilo in Chilean Patagonia, which can be reached from either Chile or from across the border in Argentina.

Tourism in the area is nascent compared to other places in Patagonia (especially El Chalten and El Calafate), so things move slowly and sometimes unexpectedly. If coming from Argentina and you don't have your own car, I'd suggesting giving yourself three or four days to get into and out of Rio Tranquilo.

The pay-off for going through the rigmarole of getting there is views such as these: 

Marble Caves

Marble Caves

How to Get to the Marble Caves

We arrived into Puerto Rio Tranquilo via the Los Antiguos-Chile Chico border crossing, originating from El Chalten. This post will cover only this route in detail. You can see from the map below there are a few key towns in the area - Los Antiguos, Chile Chico and Puerto Rio Tranquilo. In broad terms, you arrive in Los Antiguos via Route 43, cross the border to Chile Chico and then take Route 265 and 7 to Rio Tranquilo.

If you're already in Chile (say in Pucon), you can get down to Rio Tranquilo via the Carretera Austral. We ran into a few people doing this with rented 4x4s and vans.

Area map.

Area map.

Step One - Getting to Los Antiguos

We took a Chalten Travel bus from El Chalten to Los Antiguos. The bus left El Chalten on a Friday evening (around 7:30pm) and arrived into Los Antiguos at around 8am on Saturday morning. Cal-Tur also run a service between El Chalten and Los Antiguos.

It will also be possible to arrive into Los Antiguos from Bariloche if you are travelling in the opposite direction.

Step Two - Getting to Chile Chico

This is trickier than it was a year or so ago. The Argentinian government has clamped down on Chilean tour and taxi operators entering the country, requiring a US$100 payment to cross into Los Antiguos from Chile. As a result, it doesn't make any sense for taxi drivers to take a US$10 fare (at the most) to cross the border.

The Argentinian border crossing is only a couple of kilometres outside of Los Antiguos and is easily walkable. The office doesn't open until 8am, so if you arrive early into Los Antiguous on an overnight bus you'll have some time to kill.

The map below shows the general layout of the crossing:

Border crossing basics.

Border crossing basics.

From the Argentinian border control office its another 3km or so to the actual border, where you'll see a couple of signs and a small parking area / turning bay. If you manage to grab a taxi in town it will drop you here.

We got lucky here and managed to catch a ride into Chile Chico in a shared van - the driver charged us 2,000 pesos (around US$1.50) to get into town, including waiting at the Chilean border control. The driver was making a few trips back-and-forth to the crossing, so chances are good that you'll be able to snare a ride into town from the border.

Step Three - Getting to Puerto Rio Tranquilo

The van or taxi will drop you off on the main street in Chile Chico. There are a few ways to get to Rio Tranquilo from Chile Chico - the trip is around 5 hours by car so hiking isn't an easy option. Several people we met in town were trying to hitchhike (far more common and safer in this part of South America than elsewhere in the world) but the roads were quiet and they weren't having much luck.

The easiest (but not cheapest) way we found was to take a shared van which leaves from outside the Martin Pescador store on Avenida O'Higgins (the main street in town), next to the supermarket. This option wasn't cheap - 20,000 pesos per person each way (~US$30). Tickets are purchased from the Martin Pescador store (just hang around the van if nobody is there, someone will sort you out) The van leaves Chile Chico at around 11am, so if you choose to walk all the way from the border you'll need to hustle.

Marble Caves No. 2

Marble Caves No. 2

The van gets you into Rio Tranquilo late in the afternoon (around 5pm or so from memory), but you'll have a couple of stops along the way. The driver will help you find some accomodation in town - they will usually drop you off at an "affiliated" hostel. If you don't like the look of this option then there are a few other places in town.

This van you rode in on returns to Chile Chico the next day, leaving Rio Tranquilo at around midday (confirm with the driver). This gives you enough time to take a morning cave tour before catching the bus back.

Step Four - Getting a Boat to the Caves

All of the boat tour companies have small offices on the waterfront - you'll see them all as you drive into town. As far as we could tell, all boats offered the same tour for the same price (9,000 pesos per person) and depart between 8am and 9am in the morning. You're out on the water for around 2 hours, ducking in and out of the caves, driving through larger formations and getting up close the main cathedral formations.

Step Five - Back to Argentina

Just reverse the steps you took to get to Rio Tranquilo. The bus will get you back to Chile Chico late in the evening (after sunset), and you can ask the driver to drop you at a hostel. We stayed at Hospedaje Don Luis on Balcamdea, and can recommend it. The next morning you can take a taxi to the border crossing (ask the hostel to help if needed). Like your trip across the border the first time, you'll be dropped off at the actual frontier, from which point you need to walk or hitch into Los Antiguos.

We stayed a night in Los Antiguos as our bus to Bariloche left at 6am, which wouldn't have allowed us to get through the border controls (which open at 8am).

There you have it - an up-to-date guide on how to get to the Marble Caves of Puerto Rio Tranquilo from Argentina!

Lone Tree in Lago General Carrera.

Lone Tree in Lago General Carrera.

Antarctica - Trip Report

Holy smokes - what a trip!

We knew Antartica was going to blow a massive hole in our travel budget. But we also knew we probably weren't going to be back in Argentina in the foreseeable future (at least with enough time on our hands) and had set aside some funds to do it provided we got a reasonable deal. Given we were travelling slowly, we could afford to be flexible with our timing in order to take advantage of some lower sale fares.

Lone emperor penguin on the ice floes in the Gerlache Strait.

Lone emperor penguin on the ice floes in the Gerlache Strait.

Why do Antarctica from South America?

You can visit Antarctica from a few different places, usually Hobart in Australia, Invercargill in New Zealand or Ushuaia in Argentina. The biggest difference is ocean travel time, which also feeds into travel costs. From Australia or New Zealand you'll be at sea for around a week before you reach the continent, whereas from Ushuaia you'll be at the Antarctic peninsula in 2 to 3 days. With a trip from Ushuaia, you can be on board for 10 or 11 days and spend 5 or 6 of those on and around the continent.

Keep in mind that from New Zealand or Australia you'll visit Macquarie Island and the Ross Ice Shelf, so you'll get much more of the Shackleton-Mawson-Scott-Amundsen history on one of these trips. There is plenty to see on and around the peninsula, but not as much of the legendary early history.

Last Minute Antarctica Deals and Sales

With the internet having well and truly arrived in Patagonia (except El Chalten, but thats another story), the requirement to spend time camping out in Ushuaia waiting for last-minute berths has diminished. You can still do that if you've got the time and inclination, but its not as necessary as it once was.

The best way to track down sale fares is to get on the mailing list of a few travel agents in the region. From our experience, we found the following agencies to be good (well informed, good supply of deals, timely communication, etc.):

We ultimately went with Antarctica Travel - their communication was fantastic, and their staff were incredibly hard working. That isn't to say the other options above weren't good (they were all great to be honest), just that the option we chose stood out a little more.

Towering icebergs near Brown Bluff.

Towering icebergs near Brown Bluff.

Once you're signed up to the lists, you'll receive regular offers as the season approaches. We were fortunate to sign on to these email lists just before Quark Expeditions had a 50% discount special on some of their November expeditions. One of the expeditions fit our timeframe and budget, so we locked it in. This was done in late September, approximately 6 or so weeks prior to departure. 

This obviously won't work for everyone, and a lot of people plan and book these trips 12 to 18 months in advance in order to fit things around work and family commitments. You can also opt to take a berth in a twin, triple or quad share room if you're a single traveller. Plenty of people take this option to avoid excessive single supplement charges, or to avoid buying a double room for themselves.

Our Expedition

We opted for a 10 day "Antarctic Explorer: Discovering the 7th Continent" expedition, which included a night in Buenos Aires and a charter flight to Ushuaia. Having been largely self-sufficient on our trip so far (except for our Galapagos tour), it felt a little different being part of an organised tour again. Much less stress, but you sometimes miss the feeling of flying by the seat of your pants.

Everyone refers to these trips as expeditions. It makes you feel far more adventurous, and to be honest the trip is much more action-packed than a P&O cruise (you could probably manage fall in the water from a zodiac on these expeditions if you really tried). But you're not suffering like Shackleton.

We booked a twin room on the Ocean Endeavour, a former Baltic ferry leased by Quark Expeditions. When you read the words "former Baltic ferry" you're not quite sure what to expect, but rest assured the vessel is excellent. Modern, large and safe, with a very competent captain and crew. Whilst the operational crew come with the ship lease, Quark Expeditions provides their own expedition team. We had a team of 26 (comprised predominantly of New Zealanders, Australians and Canadians), with specialists for kayaking, paddle-boarding and climbing, as well as a couple of photographers 

The ship is marketed as a "wellness vessel" - anything marketed like this usually trips my BS detector. The boat had yoga classes on some mornings and a smoothie bar, but that was about the extent of the specific differences. The vessel itself was excellent - great lounge areas, plenty of deck space, a bar, great dining area. 

Our voyage map - courtesy of Quark Expeditions

Our voyage map - courtesy of Quark Expeditions

Every expedition is different, and the timetable is subject to weather and sea-ice conditions. This is continually reinforced through the trip - some areas you just can't get to safely, some days the weather is too marginal to get the zodiacs in the water. All part of the fun and adventure of being in such a remote location. We lucked out and got 5 amazing days of weather near the peninsula, as well as calm seas across the Drake Passage. The only planned stop we couldn't make was in Neko Harbour, as the sea ice hadn't yet cleared out of the bay.

Our final itinerary ended up as:

  • Days 1 - 3: Drake Passage crossing. We left in the late afternoon on Day 1 and arrived ahead of schedule in the early afternoon of Day 3
  • Day 3: Aitcho Islands (PM)
  • Day 4: Brown Bluff (AM) and Paulet Island (PM)
  • Day 5: Mikkelsen Harbour (AM and PM)
  • Day 6: Cuverville Island (AM) and Danco Island (PM)
  • Day 7: Gerlache Strait (AM) and Spert Island (PM)
  • Days 8, 9, and 10: Drake Passage crossing
  • Day 10: disembark in Ushuaia (AM)
Peninsula details - courtesy of Quark Expeditions.

Peninsula details - courtesy of Quark Expeditions.

Most days we were out on the zodiacs for shore landings twice a day (if the weather held up). We were extremely lucky to get brilliant weather for the whole time we were around the peninsula. Some stops we couldn't make landfall at (especially the smaller islands in rougher waters), so we took longer zodiac cruises to check out little inlets and bays, and get right up close to some icebergs.

The expedition crew were excellent - very experienced, very knowledgable and very friendly.

What did we see?

Penguins (chin-strap, gentoo, Adelie and emperor), icebergs, seals and some more penguins. The landscape down here is other-worldly - as someone said, it looks as though you've lopped off the highest 1,000m of the Alps or the Himalaya and dropped them at sea level.

Cruising with Pato Saunders, our zodiac-driving, hot air balloon piloting guide.

Cruising with Pato Saunders, our zodiac-driving, hot air balloon piloting guide.

Here are a few highlights:

An Adelie penguin posing on an iceberg.

An Adelie penguin posing on an iceberg.

Brash ice at sunrise.

Brash ice at sunrise.

Giant tabular icebergs at sunrise.

Giant tabular icebergs at sunrise.

Check out the rest of the set over at my Antarctica portfolio!

What gear did I take?

Pretty standard kit - I took my Nikon D810 and my older D800e, one with a 24-70mm and one with a 70-200mm lens (both with polarisers attached). This covered pretty all my needs. There were times when I wished for more zoom (a 400mm would have been great for some of the wildlife), but it wasn't an option and it wasn't very limiting. I took my tripod out once (on the first landing), and never took it out again as the light was good enough to shoot handheld, and you're not ever on land for sunset or sunrise (unless you camp).

If we were doing a shore landing with a bit of walking I'd pack my gear into my F-Stop bag, but for the zodiac cruises I'd just stuff everything into a dry bag with a towel.

Pro tip: dial in a bit of positive exposure compensation when shooting bright ice. I usually had 1/3 to 2/3 of a stop dialled in to get a decent exposure.

Anything I'd do differently?

Not really, aside from not eat so much at the buffet every day. If I ever get back to this part of world I'd jump on an expedition that covered South Georgia Island and Deception Island if possible (and maybe the Falkland Islands). These were the only "big ticket" places we didn't hit on this itinerary.

Get out there and cross off your 7th continent!


El Chalten (and the Secret Fitz Roy Cascades)

El Chalten had long been near the top of the list of places I wanted to visit in Patagonia. Being at the foot of both Mt Fitz Roy and Cerro Torre, El Chalten has a well-earned reputation as the hiking and climbing capital of Patagonia. 

Fitz Roy Massif from Mirador Los Condores.

Fitz Roy Massif from Mirador Los Condores.

How to Get to El Chalten

We arrived into El Chalten from El Calafate, which is located approximately 200km to the south, on the other side of Lago Viedma and Lago Argentina. We took a morning bus with Chalten Travel and arrived into the El Chalten terminal (at the south end of town) around 5 hours later. Cal-Tur and TAQSA also run on this route (we found Chalten Travel to be a bit cheaper than the other options) - more details can be found here.

When you arrive into El Chalten the bus will stop at the ranger station / visitor centre (APN) just outside of town, where you'll attend a short information briefing and be provided with some town and trail maps. You'll be shown a video on park and trekking safety and best-practice behaviours (don't light fires, try not to die, etc.). The ranger will also give you a low down on the weather forecast - ours was pretty spot on for the five days we were in El Chalten, so its worth a listen. Once you've made it through this, you jump back on the bus and you're dropped off at the bus terminal (located at the south end of town, just across the river on Perito Moreno).

We booked in at Pudu Lodge at the north end of town, so we jumped in a taxi with our gear (it wasn't an official taxi, just a friendly lady who waits at the bus station to run new arrivals to their lodgings, very entrepreneurial). We liked the location of Pudu Lodge - its very close to the beginning of the Mt Fitz Roy trail, which shaves off 20 or 30 minutes of walking from the south end of town (an advantage when you're heading out at 4am for sunrise). 

The town itself is small (but bigger than we anticipated) and growing rapidly. There are a couple of supermarkets where you can grab some essentials, and plenty of cafes and restaurants. We were fans of Don Guerra and B&B Burger joint. The internet still hasn't really arrived in El Chalten in any big way, and the connections are often relatively poor given they're all satellite connections. The best wi-fi (and friendliest staff) we found was in Cafe Lo de Haydee on Lago del Desierto.

El Chalten Hiking Trails and Miradors

The two principal medium-distance trails in El Chalten are the Fitz Roy / Laguna Los Tres trail and the Laguna Torre trail. Both trails will eventually take you to a lagoon near the base of their respective peaks. Two shorter trails that provide great views are the trail to the Mirador Los Condores, and the trail to Chorrillo del Salto.

Simplified trail and mirador map.

Simplified trail and mirador map.

You can see clearly on the map the two principal mountain chains of the region - the Cerro Torre massif to the east and the Fitz Roy massif further to the west.

The Fitz Roy trail (Sendero del Fitz Roy as it will be labelled on most of the signs in town) starts the north end of town. Follow the main street out past the last houses, through a car park to a large wooden gateway that marks the start of the trail. There is a large wooden map / information display which will give you can idea of the trail.

The trail is approximately 9km long (18km return if you've forgotten your two-times table) and will take you 3 hours or so each way. There are kilometre markers so you can track your progress and curse at your slowness - the first three or so kilometres are uphill (only gaining about 300m, so not too bad) before the trail levels off all the way to the start of the climb up to the Laguna Los Tres. This last section of the trail climbs 400m in around a kilometre, and is tough work if you're carrying a lot of camera gear.

On the walk up you'll reach a nice view point at Mirador Fitz Roy - on a clear day you'll get a great view of the mountain. If that is all you've come for and you don't fancy a walk up to the lagoon you could easily turn around here. Its also a nice place for sunrise, as its only a 90 minute walk from town.

Peaks of the Fitz Roy Massif, taken from Mirador Los Condores.

Peaks of the Fitz Roy Massif, taken from Mirador Los Condores.

The Laguna Torre trek takes you out to a lagoon with a great view of Cerro Torre. We didn't get a clear view of Cerro Torre during our time in El Chalten (thats the risk you run), so I can't show you any photos or speak in detail about the end of the trail. Both Fitz Roy and Cerro Torre seem to have their own weather patterns, and even when one is clear the other is often not.

As you can see on the map above, there are a couple of trailheads that connect into the main Laguna Torre trail - one each from the north, central and south points of town. The trek takes in a couple of nice viewpoints before reaching the lagoon. You'll get great views of the Rio Fitz Roy on your left after a kilometre or so, and you'll reach the Mirador Torre after around 90 minutes of walking. If its thick and foggy here, you're probably best off turning around. If its clear and you can see Cerro Torre, continue onwards. Before the Torre Mirador you'll pass the Mirador Margarita - on a clear day this has a great panoramic view of Cerro Torre and Fitz Roy. On a cloudy day like we had, you'll have a hard time picking anything out. We turned around at the Mirador Torre given the conditions.

Shorter Trails

There are two shorter trails which are great if you only have an afternoon in El Chalten. If you follow the dirt road out of town to the north you'll eventually come across the Chorrillo del Salto, and impressive 20m or 30m waterfall at the terminus of the Arroyo del Salto. This spot can also be accessed by car and tax (or tour bus) and there is a large car park near to the falls. 

The trail to the Mirador Los Condores is a short 1.5km to 2km trail at the south end of town. You access the trail near the visitor's centre / ranger's office, which is just across the bridge near the bus terminal. You gain around 200m or 300m of altitude, and the viewpoint gives you a great vista of Fitz Roy and the town of El Chalten. This is where the shot at the top of this post was taken from.

Fitz Roy Hidden Falls

It was easy to find a photo of these falls online (and they're on postcards inside every building in El Chalten), but it was impossible to find directions to the falls online. If you've found your way to this blog post, its your lucky day.

The falls are located on the Arroyo del Salto on the Fitz Roy trail, near to Laguna Capri and around 1.5km past the Mirador Fitz Roy. Its easiest to point them out on a map:

Hidden falls location (courtesy of Maps.me)

Hidden falls location (courtesy of Maps.me)

I dropped a couple of pins on my Maps.me app to remind where to find these falls (it has a much better trail map than you get in Google Maps), which you can see in the screenshot above. The first pin on the map above (on the dotted trail) is where you turn off the main trail. Before you reach this point you'll pass through some pretty narrow track sections once you're past the Mirador Fitz Roy, but the trail will begin to open up just before the turn off. From the turn-off point there are a few tracks (not as well marked as the main trail) that lead down to the river and the falls. You can't really miss it if you follow where these pins are dropped.

I found Maps.me to be excellent for hiking trails in South America generally, especially in El Chalten. It was accurate and worked offline (provided you download the maps you need in advance), which is a godsend in a lot of places in this part of the world.

The GPS co-ordinates for the turn off point are 49°17'48"S 72°56'07"W. These are the co-ordinates provided by the app, not by an independent GPS device, so take them as an approximate guide. I'd suggest doing a scout during the day to find these falls (you can easily do it as part of the trek up to Laguna Los Tres) before you attempt it in the dark before sunrise. There aren't really any objective dangers here through, just be careful around the water as you have to scramble on some rocks to get the best viewpoint here.

This is the view you'll get from the falls if the peaks of Fitz Roy are clear:

Fitz Roy Hidden Falls.

Fitz Roy Hidden Falls.

So there you have it - a rough guide to El Chalten and its trails, and a guide to finding the secret falls of Fitz Roy. Good luck, and let me know how you go!

2016 International Landscape Photographer of the Year Awards

Some more good news from the back-end of 2016. My image of La Paz in Bolivia has won the "South America Award" in the 2016 International Landscape Photographer of the Year Awards. It also made the Top 101 images, which means it will be included in the published awards book.

Check out the major prize winners here and the full gallery of the Top 101 images here.

Update: Australian Geographic has run a brief piece on the results, which can be accessed here.

South America Award 2016

South America Award 2016

2016 FOCUS Awards: Photographer of the Year

In late September 2016 I entered the FOCUS Awards, a photography competition hosted by the FOCUS Seascape and Landscape photography group in Australia. I'd entered previously in 2014 and received some great feedback, but hadn't had much success. I'd built a reasonably interesting portfolio of landscape images over the course of 2016 so I thought I'd enter a few to see how they fared under a more critical eye than my own.

There are a few reasons why I like entering these awards - they help to support the group, the standard is always extremely impressive (the excellent prize pool provided by sponsors make these awards very popular) and every year there are high quality, experienced judges lending their time to the process.

This year I was extremely fortunate to take home several awards, including:

  • Photographer of the Year
  • 1st Place in the Landscape category for my image of La Paz from El Alto
  • 1st Place in the Sunrise / Sunset category for my image of Taulliraju (Cordillera Blanca in Peru)
  • 2nd Place in the Sunrise / Sunset category for my image of Nevado Humantay near Cusco in Peru

Its humbling to have done well amongst such a talented and supportive group of people, and to have your work acknowledged by peers is extremely pleasing.

Be sure to head over to the FOCUS website (main site here) to check out the awesome work in the award galleries, there is some truly inspiring work on display.

The following images were awarded and / or contributed to my overall portfolio in the awards:

1st Place Landscape Category - La Paz and Illimani from El Alto

1st Place Landscape Category - La Paz and Illimani from El Alto

1st Place Sunrise/Sunset Category - Taulliraju on the Santa Cruz Trek (Huaraz, Peru)

1st Place Sunrise/Sunset Category - Taulliraju on the Santa Cruz Trek (Huaraz, Peru)

2nd Place Sunrise/Sunset Category - Sunrise over Nevado Humantay (Salkantay Trail, Peru)

2nd Place Sunrise/Sunset Category - Sunrise over Nevado Humantay (Salkantay Trail, Peru)

Seascape Category - Moeraki Boulders in New Zealand

Seascape Category - Moeraki Boulders in New Zealand

Black & White Category - Milford Sound at mid-tide (New Zealand)

Black & White Category - Milford Sound at mid-tide (New Zealand)

Creative Category - A composite image of Machu Picchu, a tree from the Amazon and some birds from regional Peru.

Creative Category - A composite image of Machu Picchu, a tree from the Amazon and some birds from regional Peru.

This was a great way to round out the end of 2016. Not sure what I'm going to come up with for next years awards!

Northern Chile and the Bolivian Altiplano

For those who don't know, Emma and I are travelling South America for nine months, having taken twelve months off from our jobs back in Sydney. We started in Santiago in late June and have now been on the road for around a month. Santiago was nice enough, although it is essentially just "another big city". We'll be spending some more time here towards the end of our trip so we didn't go overboard this time.

This blog post gives an overview of our first couple of weeks in Chile and south west Bolivia.

Photographically speaking, the first major stop on our trip was San Pedro de Atacama, which was a 20 hour overnight bus ride north out Santiago. We used Turbus for this leg and had a pretty decent experience - good reclining seats, warm cabin, reasonably clean (reasonably takes on a different meaning here), regular food and a toilet. Pullman looked like a good alternative, but Turbus had a whizzbang automatic ticketing machine which swayed us in the end.

Because we're travelling slowly I could carry more camera gear than I normally would when travelling. With me for the trip I've got:

  • Nikon D810 and D800E (knowing my luck one will fail on me at some point)
  • Nikon 20mm f/1.8G (small, light and sharp. Also takes 77mm filters)
  • Nikon 24-70mm f/2.8 (workhorse, sharp enough in the corners when stopped down)
  • Nikon 70-200mm f/4 (light and sharp, always useful)
  • Gitzo GT2545T Traveler tripod with a Markins ballhead

I pack all this (except the tripod) plus assorted odds and ends (filters, cable releases, etc.), my laptop and Intuos tablet into an old F-Stop Loka.

San Pedro de Atacama

We arrived pretty early into San Pedro and made our way to Hostal Mamatierra (excellent, if you're after a recommendation). A few things strike you about San Pedro when you first arrive:

  1. Its dusty, and windy, which makes sense given its location
  2. Its a tourist town, and owing to its isolation and setting, a literal tourist trap
  3. Its expensive by South American standards

That said, its a launching pad for some awesome day trips (Valle de la Luna, Valle de Muerta, Tatio Geysers) and longer trips to the Salar de Uyuni in Bolivia. On our first afternoon we decided to take a half day afternoon tour out to the Valle de la Luna.

Valle de la Luna

Located around 13km outside of San Pedro, the Valle de la Luna is an amazing landscape comprised of orange-red stone outcrops, desert sands, dried river beds and white salt crusts. We opted for a small group tour over renting bikes, as we didn't back ourselves to ride back after sunset. In a group tour you can also get up to Coyote Point for sunset which would have been a struggle on the deadly-treadly.

Most tours will take the same route - your first stop will be at foot of some modest dunes / hills which when climbed gives you a great view over the valley, similar to that in the photo below. You'll climb up to a ridge line that is a couple of meters wide, with drop offs to valley on each side below you.

Overlooking the Valle de la Luna. This is a composite image - the clouds in the shot were out of frame to the left, so I took a shot of them and pulled them over to where I wanted them.

Overlooking the Valle de la Luna. This is a composite image - the clouds in the shot were out of frame to the left, so I took a shot of them and pulled them over to where I wanted them.

After 45 minutes or so of walking around the hills, the tour takes you out to a stop to view the "Tres Marias", a grouping of two-and-a-half stone outcrops that resemble praying women (the half was lost when someone climbed an outcrop and knocked it down). It isn't the most "wow" sight you'll see (if you were self-driving and there weren't any cars parked here you'd probably fly right by them). But the formations are photogenic, and I imagine they looked better when they were fully intact.

Tres Marias - we had some great cloud that hung around all afternoon, helping to improve compositions and make exposures easier to balance. You can see the half-ling on the left.

Tres Marias - we had some great cloud that hung around all afternoon, helping to improve compositions and make exposures easier to balance. You can see the half-ling on the left.

The main point of an afternoon / evening tour of the Valle de la Luna is to catch the late afternoon and sunset light in the valley. One of the best places to take in the view is at the Mirador Piedra del Coyote (Lookout of the Stone Coyote). We arrived here only ten minutes before the sun dipped below the distant mountains, and while it was a rush to set up my gear, we could tell it was going to be a special sunset. You're perched probably 50m or so above the valley floor - there are no railings and only some rough paths, so you're free to roam around and spread out from the crowd.

We found that if you headed left from the carpark the crowd thins out enormously and the view improves. Most people tended to crowd around the main lookout point, which was off the right in the photo below. As you can see below, we got some special light on this trip.

Epic sunset looking over the martian/lunar landscape of Valle de la Luna

Epic sunset looking over the martian/lunar landscape of Valle de la Luna

That wrapped up our first day in San Pedro, an excellent day and a very productive photographic experience. Back at our hostel we booked an early morning tour to the El Tatio Geyser field.

El Tatio Geysers

Our trip out to the El Tatio geysers can be summed up in a few words:

  1. Early
  2. High
  3. Windy
  4. Cold

We were warned to layer-up for our 4:30am start, and we certainly weren't lied to. Whilst the temperature in San Pedro was bearable, the extreme elevation (4,300m - watch out for altitude sickness as you ascend quickly from San Pedro) meant that the temperature at the geysers was -10C, though it felt slightly colder given the stiff 30km/h breeze we encountered. The geysers are at their peak before dawn, when there is a lot of hot water flowing underground and the steam condenses in the cold air. Periodically the geysers will erupt - the larger mounds tend to be more impressive - although they mostly just smoulder and vent steam.

Unfortunately the strong winds on this morning also meant that most of the geyser steam was blown away quite quickly, so we didn't get the full experience here. Additionally there are now a lot of pathways and rock walls around the geysers, which takes away from the photographic attractiveness somewhat (understandable given people have died falling through the salt crust here).

Sunrise at El Tatio Geysers

Sunrise at El Tatio Geysers

The Bolivian Altiplano 

At our hostel we met Stefan and Wen - a Dutch couple who were keen to do the Salar de Uyuni tour (from San Pedro to Uyuni) on the same day that we were planning to do a tour. This was serendipitous, as not only were they good company, but we could negotiate a better group price and we had a better chance of getting a 4WD tour vehicle with only the four of us inside (versus the normal group sizing of 6 people).

We ended up choosing World White Travel (not a typo) for several reasons:

  • Their office set up was very smooth, with a very helpful saleswoman giving us a detailed run down of the tour before we decided to commit (surprisingly many operators don't do this)
  • Pricing was pretty good (upper-mid range - not the cheapest but not the priciest), and they bargained down further with us to get our business
  • They could supply an English speaking guide on the day we needed, which helped immensely as our Spanish was very scratchy, and probably not good enough to get us through a guided tour

Pricing varies depending on where you start your tour - starting in San Pedro is expensive as there are fewer tour companies here than in Uyuni. Uyuni is cheaper, as its in Bolivia (generally much cheaper than Chile) and there are dozens upon dozens of tour agencies bidding for your business. You can also start in Tupiza (~200km southwest of Uyuni in Bolivia), but this requires an extra day on the road and there are fewer tour agencies here again.

How smoothly your tour runs will come down to a fair amount of luck. The tour companies in San Pedro contract with freelance driver-guides in Bolivia, and you're never sure who you'll get on the day. We got lucky, and got an incredible guide called Abel Belen Cruz, a Bolivian who lived in Uyuni, drove his uncle's Lexus 4WD, was university educated and spoke four languages (Spanish, English, French and local Quecha). Amazing.

The guides here lead an intense life and carry a huge workload - Abel drove two days from Uyuni to pick us up at the border, and was backing up with another tour immediately after ours (another two days drive back, and three more days driving on tour).

All tours from San Pedro follow the same basic route and see the same main sights, and below is a rough outline of our tour:

Simplified map of our tour

Simplified map of our tour

Day one starts in San Pedro, with a quick (ish) trip to Chilean immigration to get your passport stamped to cross the border into Bolivia. Your driver takes you to the border crossing at Hito Cajon, where you file into a small office and get your Bolivian visa (30 days standard, although you can ask for 60 days and save the hassle of extending later).

Here you also meet your driver - in our case Abel had set out some cake, hot cocoa and coca mate (made from coca leaves, and helps offset altitude sickness symptoms) for us all. A short drive later you arrive at the Bolivian national parks office where you pay your Reserva nacional de fauna andina Eduardo Avaroa (REA) entry fee. The REA is the national park shown in green on the map above, and covers most of the prime lagunas and desert land in the very southwest of Bolivia.

Stop one is Laguna Blanca and Laguna Verde, two lagunas that sit in the shadow of Volcan Licancabur. Both lagunas are drying out over time (some say climate change, though the mining sector here sucks out a huge amount of water to support their operations), and there is now noticeably less water in Laguna Verde than older photos show.

Laguna Blanca, with our 4WD tour vehicles in the background and Licancabur in the distance.

Laguna Blanca, with our 4WD tour vehicles in the background and Licancabur in the distance.

Around the corner from Laguna Blanca is Laguna Verde, which is permanently a shade of aqua / green due to high arsenic and other mineral content. Don't drink the water.

Laguna Verde - you can see the old water levels in the white salt crust.

Laguna Verde - you can see the old water levels in the white salt crust.

The next stop of significance was the Desierto de Dali (Dali Desert), which in theory resembles the paintings of Salvador Dali. We didn't stop particularly close to the main rock formations so it was impossible to get a workable photograph. To preserve the area 4WDs are banned from driving close by the valley, so you either need to pack a solid zoom lens or walk for a kilometre or two. You'll have to take my word that it looked cool, if a little distant.

After the Dali Desert we visited our second set of geysers, the Sol de Manana geyser field. These were impressive - huge open pools of boiling mud, erupting steam vents and the strong stench of sulphur. The combination of altitude and sulphur emissions will make you light-headed quickly, so take it slowly. The geysers are surprisingly difficult to shoot given how flat they are and how harsh the light tends to be in the mid-morning - I tried to focus on the details to show how Martian the landscape is. Its an interesting mix of red rock, white salt crusts and yellow-green sulphur deposits.

The boiling mud pools of the Sol de Manana geyser field

The boiling mud pools of the Sol de Manana geyser field

It will probably be around mid afternoon by the time you get to Laguna Colorada (Reg Lagoon), a huge lagoon populated by dozens of flamingoes. On the banks of the lagoon you'll usually find llamas and vicuna scratching around for food. Pack all your lenses for this spot - wide angles for sweeping views of the lagoon, plus a good telephoto zoom for the flamingoes and detail shots.

Wide shot of Laguna Colorada showing the red waters and white borax banks

Wide shot of Laguna Colorada showing the red waters and white borax banks

Given the lack of rain in the dry season the water levels were reasonably low when we visited, revealing a lot of the white borax banks, and also creating swirling textures where the remaining water sat.

Meandering waters of Laguna Colorada

Meandering waters of Laguna Colorada

Laguna Colorada was the last stop of day one, and we drove to our nearby accomodation for the evening. Accomodation is basic out here - no showers or hot water, but its pleasant enough. At 4,500m the overnight temperature was below zero, and the lack of oxygen meant none of us slept very well. After dinner and sundown I ducked outside to see what the sky looked like and try my hand at astrophotography for the first time.

Wow. With less atmosphere to look through and no nearby city lights the night sky way astounding. Sadly the surrounding landscape was less than inspiring in the dark and I was too tired to trek out to find a dead tree to shoot. So I settled on a composite, with the foreground taken earlier in the afternoon and the Milky Way captured after sundown.

Milky Way captured on our first night on tour, with the foreground from earlier in the afternoon.

Milky Way captured on our first night on tour, with the foreground from earlier in the afternoon.

The second day of the trip was similar in a sense to the first. Our first main destination was the Arbol de Piedra (Stone Tree) and the Siloli Desert. While the stone tree and its surrounding rock formations are interesting, the real highlight for me here were the multi-coloured hills in the distance.

Multi coloured hills in the Siloli Desert

Multi coloured hills in the Siloli Desert

Without sounding blase, the remainder of the day was much like the first - more desert, more lagunas and flamingoes, but rockier roads. At times you have to pinch yourself when you catch yourself thinking "Oh, another laguna, looks like the previous one...", just to reset your frame on reality. You're still in one of the most breathtaking places in the world, more than 4,000m above sea level and surrounded by stunning scenery.

I feel like the shot below, though simple and a bit cheesy, sums up the landscape on the afternoon of our second day. Bunch grass, rocks big enough to threaten the undercarriage of the 4WD if you weren't careful, and bright blue sky.

Bunch grass on the altiplano.

Bunch grass on the altiplano.

Volcan Ollague

The last stop before our accomodation was the Volcan Ollague Mirador, which gave you an elevated view of the only active volcano on the tour route. My ears certainly pricked up when I heard "active volcano".

Volcan Ollague straddles the border between Chile and Bolivia, with ownership split between the countries based on altitude and geographic location. Whilst the volcano doesn't have a history or eruption, there is constant steam activity on the southern flank, and there are/were active sulphur mines up and down the mountain. Historical lava flows and land slips have resulted in an interestingly textured and colour mountain face.

We got lucky on our visit as there was some decent cloud building out behind the volcano (and almost none behind us). This is one of my favourite shots from the trip to date.

Volcan Ollague under moody skies.

Volcan Ollague under moody skies.

After a brief stop at the mirador we continued on through one of the smaller satellite salt flats (near Chiguana) that surround the main Salar de Uyuni. The area isn't as pristine as the main salar, with small towns dotted around the perimeter and along the train tracks that run through the flats. As a result the salt flats here tend to be coated in varying layers of dirt and industrial grime.

Tracks on the salt flats

Tracks on the salt flats

We overnighted at a hostel in San Juan, with floors made of salt and a salt-brick veneer covering the internal walls. Great in practice, but walking back to your room across a salt floor with wet feet soon outweighs the novelty factor.

Salar de Uyuni

We didn't reach the Salar de Uyuni until our final day on the tour, and most of us had marked this down as the likely highlight of the tour. Setting off from San Juan at 5am, we headed to an island in the centre of the salar (Isla Incahuasi or "Fish Island") to catch the sunrise. Given that the edges of the salt flat tend to be quite soft, there are set pathways in and out of the flats which have been reinforced, and its quite a sight to see a dozen or more 4WDs racing across the salar trying to beat the rising sun.

We were visiting in the dry season (winter), so you could access the entirety of the Salar de Uyuni by 4WD. In the wet season you're more limited in where you can get to (and you can't get out to the island) but you do get the epic reflection shots when there is a layer of water over the flats.

Once at the island you pay your entrance fee (15 or 30 bolivianos each from memory, around A$3 - A$6), record your name in the log book and race up the hills to find a vantage point. The isla itself is an ancient reef bed, covered in fossilised corals and now covered in huge cacti.

The sunrise that morning wasn't phenomenal, but that's a rarity anyway and you're in an amazing setting to begin with so it isn't hard to get a pleasing image.

Sunrise over the Isla Incahuasi

Sunrise over the Isla Incahuasi

Coming from Australia, cacti like this are an unusual site. I'm sure the local Bolivians and Chileans have had there fill (much like Sydney photographers and ocean rock pools), but for us they're unique and special.

Cactus Forest on Isla Incahuasi

Cactus Forest on Isla Incahuasi

After a quick breakfast and warm coffee we headed out to capture some of the classic images of the tessellated patterns of the Salar de Uyuni. We didn't get the classic bright blue skies you usually see in photos of the Salar, but the clouds and backdrop were dramatic enough for me.

Salar de Uyuni patterns.

Salar de Uyuni patterns.

Although it goes against the ethos of the frowning, moody landscape photographer, you're encouraged to clown it up here. To be honest I think you'd be a bit disappointed if you came away from the flats without the usual false-perspective profile shots. Thanks to Emma, Stefan and Wen for forcing these out of me (I tend to look better behind the camera rather than in front of it, and am certainly far more comfortable behind it).

Hamming it up with the group.

Hamming it up with the group.

In addition to being our driver, cook and tour guide, Abel also nailed the perspective shots for us ("little to the left, a little back, now a little closer...perfect...now crouch down like a monkey").

Save for a quick trip to the salt museum, Colchani (a traditional salt-mining and processing village on the edge of flats), and the train cemetery outside of Uyuni, that was the end of our tour. We were dropped into Uyuni, where Stefan and Wen headed north to Potosi and Emma and I headed southwest the next morning to Tupiza.

Including our time in San Pedro, we'd been on the road for only a week, but the sheer volume of sights we saw and amazing locations we visited was immense. The only time my camera was out of my hands was when I was sleeping or eating, and it was one of the most productive photographic trips I've been on, despite being a "standard" tour. If you self drove or took a specialist photographic tour you could end up in some spectacular locations for golden-hour shooting.

Tips and Recommendations

Having covered all this ground I think its useful to give some tips and recommendations based on our experience. Despite some of the horror stories you read online about bad tours, rubbish hostels and terrible drivers, we had a smooth and uneventful week or so in the region.

Chile and the Atacama

  • How to get from Santiago to San Pedro? 

You can fly from Santiago to Calama (nearest airport to San Pedro) or you can take an overnight bus for 20 hours. We were up for an adventure so we took the bus. We used Turbus, which was clean, on time and safe (they had a few drivers who would share the driving duties)

  • How long to stay in San Pedro?

We stayed two nights, which gave us enough time to see the Valle de la Luna on the first afternoon and the Tatio geysers the next morning. You can also do a full-day tour which covers the geysers and a bunch of lagunas and a mini-salt flat if you're up for it. We didn't feel pushed for time (we could have spent another night here), and San Pedro is quite expensive for what you get.

If you're doing a Salar de Uyuni tour from San Pedro you can probably skip the lagunas and salt flat here - they're more impressive on the Salar de Uyuni tour.

Salar de Uyuni

  • How do you choose your tour company?

A lot of it comes down to luck. Almost all of the tour agencies are located on the main street in San Pedro (Calle Caracoles), so your best bet is to wander down and stick your head into a few places to get pricing and to suss out the vibe. We chose World White Tours - they looked professional, had great salespeople and could provide us with an English speaking guide on the day we needed to depart. You'll pay somewhere between 100,000 and 130,000 pesos per person for a tour here.

All drivers in Bolivia are generally freelance and will work across multiple agencies, so you can't really predict who you'll get. We ended up with a fantastic guide who spoke excellent English (plus French, Bolivian and Quecha). If you pay more for an English-speaking guide, the chances are you'll get an experience, safe and university-educated driver.

  • Where can you do the tour from?

Three main places - San Pedro in Chile, and Uyuni and Tupiza in Bolivia. Uyuni is the cheapest, given there are many more tour companies operating here and Bolivia tends to be much cheaper than Chile in general. San Pedro is in the middle - there are fewer tour operators here so there isn't as much competition, plus you need a Chilean driver to get you to the border. Tupiza tends to be more expensive - its 200km from Uyuni which equates to at least 4 or 5 hours driving. You generally need an extra day to the tour route from here, and there are only a handful to tour companies in town.

The tour route is broadly the same - if you start in San Pedro you do it in reverse order to Uyuni. This can be good, with the stops tending to be less crowded, as the hoards departing from Uyuni are visiting at generally opposite ends of the day.

  • What to bring?

We took all our gear, as we weren't returning to San Pedro. If you're doing a return trip to San Pedro or Uyuni, try and leave some gear at your hostel or hotel. Its surprisingly cold at altitude here, even during the day, so layer up. Most of the time were in thermals (Icebreaker 160 or 200 weight), shirts and a fleece top, with and a jacket over the top when we were outside (sometimes a windproof jacket on top of all this too, though it got tough to zip it up).

Change a bit of money into Bolivianos before you leave San Pedro (bring some USD, GBP or Euro with you, you often won't be able to change AUD). You need around 200 Bolivianos per person to pay entry fees to the parks and island, plus a bit more if you want to buy snacks or drinks (a 500ml bottle of Coke is around 5 bolivianos (A$1) as a guide). Only change what you need - the exchange rate at the cambios in San Pedro is about 20% under the spot rate and there are ATMs in Uyuni.

Meals should be included in your tour price, but drinking water isn't. Its recommended to bring 5L per person, and you can buy big 6L jugs in San Pedro if you want.

  • How was the altitude?

Its a bit of a lucky dip as to whether you get sick. You ascend quickly once you leave San Pedro, from around 3,000m to above 5,000m at some points on day one. One lady on our tour was badly affected overnight at our first stop, but the rest of us were generally OK. A bit of light-headedness and a lingering headache is pretty normal. Don't eat huge meals, as digestion uses a lot of oxygen, breathe deeply and take it slow and you should be OK. Get a prescription for Diamox before you leave home (just in case), and coca tea can take the edge off the symptoms if you do get sick.

Feel free to drop me a line in the comments below if you have any questions or thoughts.